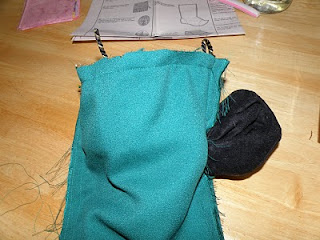
I spent the better part of my on-my-feet hours today cutting out all of the pieces for the crib skirt. I had cut out the panels I needed for the curtains first since they were the biggest pieces. Next, I needed to cut out the pieces for the crib skirt, and then finally with the leftovers I could cut the tabs for the tab-top.
Since almost all of the pieces were perfect squares, I decided to use my rotary cutter and rulers. This seemed to work very well with the cotton-as-linen. However, when I got to the silk I really struggled. My cutting surface was not big enough for the long cuts that I needed to make. So I had to move the cutting pad under the silk mid-way through cutting a piece out. Trying to keep the silk and the pattern in one place while moving a rubbery surface underneath didn't end up working out so well. I also struggled with keeping the silk squared off. I'm not sure if it will be noticeable, but I found it very frustrating as I went.
So now I have all of the pieces cut out and ready to be thrown together. All I have left to cut are the tabs for the tops of the curtains and the two big panels of the curtain lining. Hopefully it will start coming together quickly now.
Still no baby. I'm now 9 days past my due date...
Sunday, August 15, 2010
Sunday, August 8, 2010
Baby's Room!
I am a few days over my due date with my first child, a baby boy. I have been planning to sew curtains and a crib skirt for the nursery since my husband and I decided to start a family. We decided on the theme for the nursery (woods/forest) back in March when we found out we were having a boy. Pretty soon thereafter, the plan for the linens in the baby's room started to form.
I am sewing a side-drape, tab-top, single-panel curtain in white faux-linen with a green silk border. The crib skirt will be done with matching fabrics with a similar width band at the bottom. I'm using McCall's 4855 as the pattern for the crib skirt. Below are samples of the fabric from Fabric Warehouse.


I have never made curtains before, so the size of the fabrics has been a little intimidating. It's also my first time working with silk, also intimidating. So far, I have washed all of the fabrics, and pressed the fabrics for the curtains. I have a little more fabric to press, and then I can get going on putting things together!
I am a little disappointed with how the silk came out of the wash. I read online that dupioni should be washable on the lowest setting and can even be dried on low in the drier. So I tried these steps, and ended up with a ton of little creases. I knew that I would need to be able to wash the completed pieces, as they will be in a child's room for many years. So I'm glad I started out with washing the items, but I mourn the luxurious even drape of the silk when it first arrived.
I am sewing a side-drape, tab-top, single-panel curtain in white faux-linen with a green silk border. The crib skirt will be done with matching fabrics with a similar width band at the bottom. I'm using McCall's 4855 as the pattern for the crib skirt. Below are samples of the fabric from Fabric Warehouse.
I didn't have everything in place to start working on the pieces until my third trimester, which I found terribly exhausting. It is only now, as things are winding down at work, and the baby is getting ready to make his entrance into the world, that I am finding time to try to put the pieces together.
I have never made curtains before, so the size of the fabrics has been a little intimidating. It's also my first time working with silk, also intimidating. So far, I have washed all of the fabrics, and pressed the fabrics for the curtains. I have a little more fabric to press, and then I can get going on putting things together!
I am a little disappointed with how the silk came out of the wash. I read online that dupioni should be washable on the lowest setting and can even be dried on low in the drier. So I tried these steps, and ended up with a ton of little creases. I knew that I would need to be able to wash the completed pieces, as they will be in a child's room for many years. So I'm glad I started out with washing the items, but I mourn the luxurious even drape of the silk when it first arrived.
Sunday, March 14, 2010
Belated: Quilt Top Pieced
Back in March, I finished piecing the Colorado Quilt. Here is a picture of the finished quilt top laid out on my bed in my terribly messy room.

I lost my enthusiasm for the project partly because I am terribly unsure how I am going to go about quilting it. The pattern calls for an awesome squared spiral, but I don't think my machine will manage turning the corners with all of bulk of the entire length of the quilt. Part of me wants to get it professionally quilted. Part of me wants to do some other quilting solution, such as vertical lines across the entire quilt.
I was also a little overhwelmed by all of the colors when laid out on a bed. At this point, I don't plan the quilt to go on my bed. I have (as you can see) a very dark red wall behind the bed, which works very nicely with the cream-colored and red-accented quilt that I currently use on the bed. But with the bright greens, purples, and soft pinks it didn't work so well. So it will likely go in the guest room, for which I don't have any furniture at the moment, further de-motivating me.
Sunday, February 14, 2010
Quilt Progress
Last week, I finished up the 18 pink blocks with the new fabric. This weekend I was able to place all of the blocks on the quilt wall and started on piecing those together. It's going very well and quite quickly so far. It's an exciting point to be at!

Sunday, January 17, 2010
Bronwyn's Christmas Stocking Complete!
I completed the Christmas stocking for my husband today. This one have been sitting around since late 2008. I wanted to finish it before I put away all the Christmas goodies, and thatwas motivation enough!

Since my last post on the topic I had successfully stitched the boot front and back together. So all that was left this weekend was the cuff and putting it all together. My husband had modified the pattern when we started on the project in '08 because he wanted the boot cuff to be much wider than the boot, with an open, pointy front. I cut that out of red cotton corduroy and striped it with gold braid.


The cuff sides and bottom were sewn face-to-face with a matching black piece. The back edge of the cuff was also sewn face-to-face where it would extend past the circumference of the boot itself. I then cut the seam allowance to allow the remaining fabric to sit flat open.

Next came lacing the boot in preparation for final assembly. This was incredibly tricky, as the cording was pretty much exactly the same size as the grommet opening. With taped ends and a lot of twisting, pulling, and pushing, I managed to get the laces through.

Putting the whole thing together was definitely the hardest part. I had the main boot layer, two layers of cuff, which were much longer than the other layers, and then one layer of lining, with braid occasionally as well. I meticulously pinned the various layers together and then stitched, one side at a time so as to leave the extra cuff layers out of the stitching.

Then, I had to push the entire stocking, the boot, the cuff, and the lining, through a tiny hole left open in the lining for just such a purpose. I ended up having to rip the seam out a little bit, but I stitched it closed afterwards, and you would never know.
With a little touch up to the loose ends such as the front of the cuff and adding the loop, the stocking was complete! Only then did I notice that I hadn't used the interfacing that I knew the project called for... Looking back in the pattern instructions, I found the bit about the interfacing, the very first step after cutting out the pieces, followed by a bunch of hoopla about how to decorate the stocking to match what is shown on the pattern envelope. I had skipped all of that without realizing I had missed an important bit. So, the stocking hangs pretty limp. We'll just have to fill it early in the Christmas season!


Next came lacing the boot in preparation for final assembly. This was incredibly tricky, as the cording was pretty much exactly the same size as the grommet opening. With taped ends and a lot of twisting, pulling, and pushing, I managed to get the laces through.


Saturday, January 2, 2010
New Year, Renewed Efforts
2010. Hard to believe!
I have finished Dragon Age: Origins, the great sewing diversion. And I have finally gotten my sewing space reclaimed. (If I don't use it for more than a day or two, it gets consumed by my husband's tech projects. The longer it doesn't get used, the harder it seems to be to dig out.)
With the holidays over (although I do still have family in town for another week and a half), I hope to have a renewed focus on sewing. However,
I am pregnant!
Things haven't been two bad so far, but I do find myself with less energy than I am accustomed to. So that may impact things a little.
I did renew work on Bronwyn's Christmas stocking yesterday (a little late, I know). It's been so long since I worked on it, that I didn't quite realize where I was at with the project. Turns out, I need a spool of thread to really be able to go on. More on that soon.
2010 is going to be full of changes. I fully intend sewing skills and completed projects to be among them.
On to the next stitch!
Subscribe to:
Posts (Atom)