Showing posts with label Christmas. Show all posts

Sunday, December 29, 2013

A Tale of Two Pillowcases

My youngest, who will be two in August (two!) is a serious cuddler. He loves to throw himself full-force into a pillow and pretend to snore. My oldest (turned three in August) has been using a pillow that my grandmother made for me when I was a little girl. The pillowcases that are still laying around for it are very girly and frilly. We've been using a standard size pillowcase for it with the extra length just folded up. I decided that for Christmas this year, I would make my boys pillowcases and find a nice pillow for the youngest.

I picked up some flannel cotton at my favorite local fabric store (now Colorado Fabrics), and got to work. I used 1/2 yard for each pillowcase. First, I folded down the selvedge ends to create a 2" cuff. Then, I folded the cuffs to match and closed the cut sides with French seams. Quick and oh-so satisfying.

The first went pretty well, but I only squared the fabric on one side and ended up with a little bit of an uneven seam on the other side.


For the next, I squared both cut ends of the fabric right away and ended up with not enough fabric to cover the pillow. After a second trip to the fabric store, I proceeded the same way I did with the, first, thinking that with the pattern I had chosen any minor differences would be hardly noticeable. The pillowcase is not nearly as lopsided as it looks in this picture.


I am incredibly pleased with the results and my boys are super happy with their new pillow and pillowcase. It's so satisfying to work on small projects that I can complete in a relatively short period of time.

Tuesday, August 23, 2011

One Year Later...

So, my son was born on August 20th, and here I sit a year later, finally starting to think about sewing and blogging again. What a year it has been!

I have accomplished a little bit of sewing in the last year. I finally finished up the curtains and crib skirt around Christmas time, although I don't seem to have any pictures at the moment. I'll have to take some. I also made my son a blank slate of a Christmas stocking for him to embellish in future years (another McCall's 5549).

I also made myself two pairs of pajama pants, both using Simplicity 2317, which I love. The second pair was in a green plaid. It was my first experiment with plaid, and it didn't get close to lining up, but it was a good learning experience.

I've been attempting to whip up two pairs of pajama pants for my husband using Butterick 5572 (finally a pajama pants pattern with pockets!). After several false starts I now need to start over completely because the baby got ahold of and shredded the pattern pieces before I managed to cut any of the fabric.

I have a new goal of making my son a Halloween costume before Halloween. I'm using Simplicity 2561, the pants from view B, right, and the top from view D, bottom left. I've never tried a shirt before, so there are definitely some challenges here. I feel like Halloween costumes are a good time to make mistakes, though.

Also on my radar is a quilt for my son, who will be ready for a bed and blankets before we know it, and a baby quilt for the next son or daughter, due April 2.

This may all be a bit overly ambitious, especially for a pregnant woman with a burgeoning toddler. However, summer is winding down, meaning more time indoors, my son is close to weaning, and I like to have goals. I may not get all these things done in the time frame I would like, but I like to have something to work towards.

Sunday, January 17, 2010

Bronwyn's Christmas Stocking Complete!

I completed the Christmas stocking for my husband today.  This one have been sitting around since late 2008.  I wanted to finish it before I put away all the Christmas goodies, and thatwas motivation enough!


Since my last post on the topic I had successfully stitched the boot front and back together.  So all that was left this weekend was the cuff and putting it all together.  My husband had modified the pattern when we started on the project in '08 because he wanted the boot cuff to be much wider than the boot, with an open, pointy front.  I cut that out of red cotton corduroy and striped it with gold braid.


The cuff sides and bottom were sewn face-to-face with a matching black piece.  The back edge of the cuff was also sewn face-to-face where it would extend past the circumference of the boot itself.  I then cut the seam allowance to allow the remaining fabric to sit flat open.


Next came lacing the boot in preparation for final assembly.  This was incredibly tricky, as the cording was pretty much exactly the same size as the grommet opening.  With taped ends and a lot of twisting, pulling, and pushing, I managed to get the laces through.


Putting the whole thing together was definitely the hardest part.  I had the main boot layer, two layers of cuff, which were much longer than the other layers, and then one layer of lining, with braid occasionally as well.  I meticulously pinned the various layers together and then stitched, one side at a time so as to leave the extra cuff layers out of the stitching.


Then, I had to push the entire stocking, the boot, the cuff, and the lining, through a tiny hole left open in the lining for just such a purpose.  I ended up having to rip the seam out a little bit, but I stitched it closed afterwards, and you would never know.


With a little touch up to the loose ends such as the front of the cuff and adding the loop, the stocking was complete!  Only then did I notice that I hadn't used the interfacing that I knew the project called for...  Looking back in the pattern instructions, I found the bit about the interfacing, the very first step after cutting out the pieces, followed by a bunch of hoopla about how to decorate the stocking to match what is shown on the pattern envelope.  I had skipped all of that without realizing I had missed an important bit.  So, the stocking hangs pretty limp.  We'll just have to fill it early in the Christmas season!

Thursday, November 19, 2009

Bronwyn's Stocking

After an ill-advised attempt to work with faux leather early in my sewing experiences, I did not get a stocking made for my husband last Christmas.  I came across some fabric-weight faux suede on sale at Joann's at Halloween time and decided to try some of that instead.  So now I'm working on making a neat boot-esque stocking for this Christmas.

My husband decided he wanted a tongue of green satin showing between laces on the top of the boot.  With my front and back cut out and ready to go, I was a little stumped on how to get the tongue in and make it look polished.  I ended up basting the right sides of the boot together up to the point where the tongue would start.


I took a straight rectangle of satin and sewed it right-sides together to one of the fronts of the boot.  I then let the satin sit naturally with right-sides out to find the placement, pinned, and then sewed it.


After cutting off the excess satin, I finished the edges with an overlock stitch.  I then removed the basting stitch and opened up the stocking so that I could insert grommets for the lacing.


With the tongue and grommets in place, I can now sew the boot front and back together with the tongue edge finished under the boot seam.


I'm not crazy about the waffling in the satin.  If I had it to do over, I would try to figure out the placement of the satin piece first and center it on the lengthwise grain of the fabric.  As I was sewing the two sides I could tell the difference in the pull of the side that had more bias in it.  I also didn't do a test for tension and stitch length, which would have been a good idea.  My husband says it looks cool, like the tongue is just floating behind the boot, but I never can tell if he's just being kind.

Tuesday, November 17, 2009

Sewing Project #3: Christmas Stocking


With a cozy pair of pajamas and a fun but not terribly flattering poodle skirt under my belt, Christmas time was fast approaching. I was working on the Colorado Quilt in bits and pieces, but got excited about the idea of making a custom Christmas stocking.  After perusing some options, I decided to go with a big three pattern, McCall's 5549 to be precise.

I used view B for the basic shape, and went about designing my own decorative elements.  Putting my newfound quilting skills to work, I started with piecing together 2" squares for the main portion of the stocking from Christmas-y cotton quilting fabric.  After adding batting and an underlayer of tulle, I quilted the squares "in the ditch" so-to-speak.  I then stay-stitched around the shape of the stocking inside the seam allowance and cut it out.


I then added red corduroy toe and heel covers with Christmas-y white and gold piping at the edges.  The piping I found was really neat, although I unfortunately don't have any photos.  It looked just like cording you would find anywhere, but it was attached to a flat woven edge.  Very easy to insert.  The trickiest part was lining up the toe and heel pieces on the two sides.  The piping made that especially difficult, as it was significantly thicker there than in the other spots, which made it want to shift.


For the lining, I used a poly shimmery gold brocade that was a bit tricky to work with and unraveled everywhere.


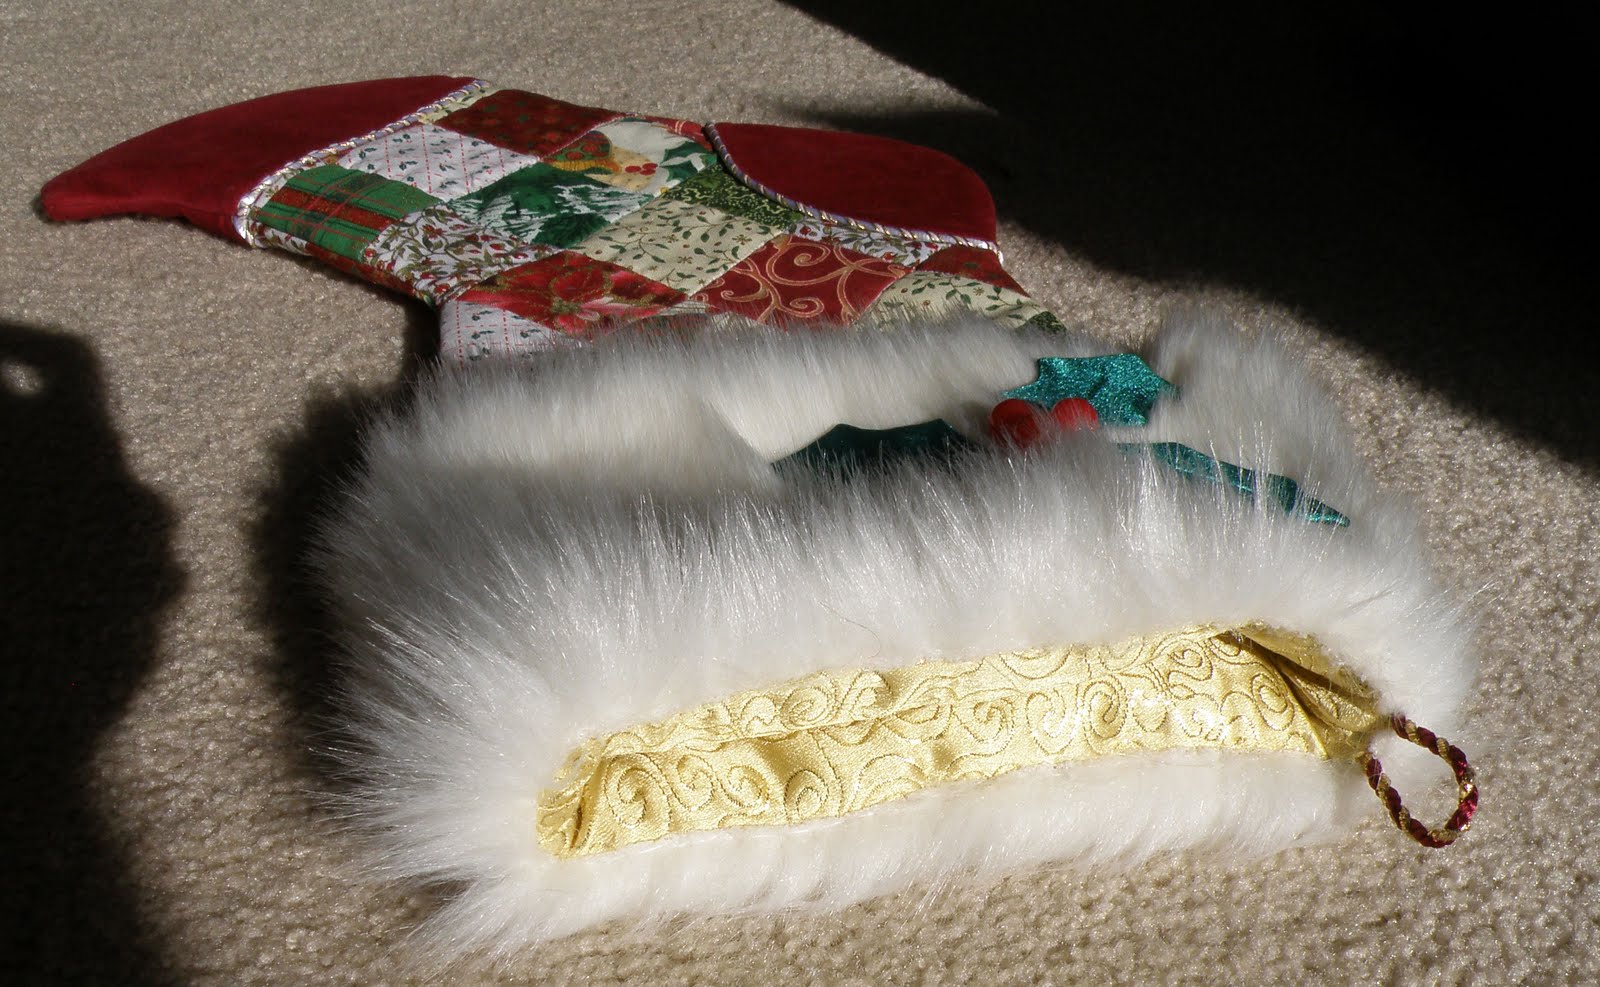
With that done, all that was left was to add a cuff.  I ordered some faux polar bear fur from some place online that I don't now recall.  I stitched it to the lining fabric to create a loose cuff that I could add to the stocking top.  I should have done this first, but afterwords, I cut holy leaf shapes from stiff interfacing and steamed some green satin to the shapes.  I then attached the leaves to the cuff with a single stitch down the center to look like the stem of the leaf.  Three red buttons in the center of the leaves made cute holy berries and the cuff was ready to be attached.  I sewed the lining layer to the stocking with right sides together and then hand-stitched the fur layer in place so that the stitches wouldn't get in the way of the fun bounce of the fur.

The green of the satin is a much closer color to the greens of the cotton in person than they turned out looking on the camera.


A view of the top/inside of the completed stocking.

I was incredibly, absurdly, ridiculously happy with how the stocking turned out.  I enjoyed the ability to be original and creative with the elements of the piece, and I also loved working on something that came together so quickly.