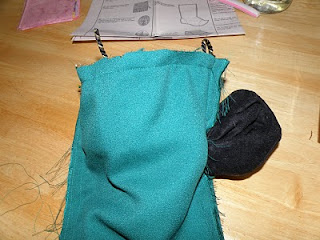
Next came lacing the boot in preparation for final assembly. This was incredibly tricky, as the cording was pretty much exactly the same size as the grommet opening. With taped ends and a lot of twisting, pulling, and pushing, I managed to get the laces through.
A novice sewist embarks upon a journey comprised of stitches, fabrics, and visions brought to life...
Sunday, January 17, 2010
Bronwyn's Christmas Stocking Complete!
I completed the Christmas stocking for my husband today. This one have been sitting around since late 2008. I wanted to finish it before I put away all the Christmas goodies, and thatwas motivation enough!
Since my last post on the topic I had successfully stitched the boot front and back together. So all that was left this weekend was the cuff and putting it all together. My husband had modified the pattern when we started on the project in '08 because he wanted the boot cuff to be much wider than the boot, with an open, pointy front. I cut that out of red cotton corduroy and striped it with gold braid.
The cuff sides and bottom were sewn face-to-face with a matching black piece. The back edge of the cuff was also sewn face-to-face where it would extend past the circumference of the boot itself. I then cut the seam allowance to allow the remaining fabric to sit flat open.
Next came lacing the boot in preparation for final assembly. This was incredibly tricky, as the cording was pretty much exactly the same size as the grommet opening. With taped ends and a lot of twisting, pulling, and pushing, I managed to get the laces through.
Putting the whole thing together was definitely the hardest part. I had the main boot layer, two layers of cuff, which were much longer than the other layers, and then one layer of lining, with braid occasionally as well. I meticulously pinned the various layers together and then stitched, one side at a time so as to leave the extra cuff layers out of the stitching.
Then, I had to push the entire stocking, the boot, the cuff, and the lining, through a tiny hole left open in the lining for just such a purpose. I ended up having to rip the seam out a little bit, but I stitched it closed afterwards, and you would never know.
With a little touch up to the loose ends such as the front of the cuff and adding the loop, the stocking was complete! Only then did I notice that I hadn't used the interfacing that I knew the project called for... Looking back in the pattern instructions, I found the bit about the interfacing, the very first step after cutting out the pieces, followed by a bunch of hoopla about how to decorate the stocking to match what is shown on the pattern envelope. I had skipped all of that without realizing I had missed an important bit. So, the stocking hangs pretty limp. We'll just have to fill it early in the Christmas season!
Next came lacing the boot in preparation for final assembly. This was incredibly tricky, as the cording was pretty much exactly the same size as the grommet opening. With taped ends and a lot of twisting, pulling, and pushing, I managed to get the laces through.
Subscribe to:
Post Comments (Atom)


No comments:
Post a Comment